
When I read a blog post or a long web page, one of my favorite things is to do to jump into a specific section that I will read first. This is made possible thanks to anchor connections.
Wanna see what I mean? Scroll to the table of contents below. Each of the items in the table of contents can be clicked so you can jump directly to that section.
Pretty cool, right? The best thing about it all is that it is super easy to create an anchor link yourself, even if you do not have extensive HTML knowledge. If HTML-Speak feels confusing, just keep up with the real examples below.
Note: If you are a hubspot customer, Follow these instructions.
Table of contents
What is a HTML -Hyperlink?
An HTML HyperLink is a clickable link that can be attached to any HTML element on a web page such as an image or text. These links can be used to direct users to other pages of your site, external sites or even specific parts of a web page.
Hyperlinks are created using HTML code, which is the language used to structure your site. Strategically using hyperlinks can help you improve the user experience of your site by guiding users through your content and helping them discover related information.
What is a html -anchor link?
An HTML anchor link, also known as a springlink, is the link that takes you to a particular part of a web page. Ankerlink is especially useful for guiding users through a long side.
A good example of this is the table of contents I mentioned above. The table of contents uses anchor link that connects to different sections of this blog post, making it easier for readers to find the exact information they are looking for.
To allow people to effectively “jump” to a particular part of a web page can make your site content more engaging. It is also important for the user experience as it makes your content more convenient and rolling for visitors to your site – but you have to make sure you do everything right.
External links vs. Jump -Links
A springlink is a link that ‘jumps’ to a specific section on a page on your site. However, external links are hyperlinks that direct users to a page on another site.
Anatomy of an anchor link
Creating an anchor link is simple. But it is useful to understand which HTML elements are involved and how they all connect. These are the items required to create an anchor link.
1. Anchor element
The most essential HTML element in an anchor link is the anchor element mark. This is the letter “A” with angular brackets on each side. It looks like this: .
When you add the anchor element, it can hyperlink to a webpage, e -mail address, phone number, file or section of content on the same page.
2. Href
HREF – which stands for Hypertext Reference – is an attribute that specifies the destination for a link on a web page. A HREF attribute is usually added to define where the anchor link should be corrected.
3. ID tag
The ID mark is an identifier that defines a unique element of HTML. In case of anchor link, ID is used to identify the section on the page you want to link to.
When you add an ID to your anchor link code it should look like this:
Want to learn more about HTML Basics and CSS hacks? Download this free E book packed with 25 specific tips and coding templates.
How to create an anchor link
Now that I have shared the most important elements that go into an anchor link, I will show you how to create an anchor link on your web page, step by step.
1. Name the object or text you want to link to.
In a normal interconnection scenario, no matter what you need to link to your own URL. In this scenario, however, you do not link to a new page with its own URL – so you have to put together a name on the destination of the link.
I would recommend using a word or phrase that describes the destination of the link. If you use a sentence, use underlining between each word instead of spaces, otherwise the code will not work.
Example
Let’s say I write a how-to-blog post that is filled with examples. If I wanted to link to a specific example in the post here is what I would use as my object’s name:
Example_1
Now on the next step.
2. Insert anchor link tag.
Take the name you have chosen and insert it into an opening of HTML -anchor link roof.
In other words, replace the red section of the brand below with the name you chose in the previous step:
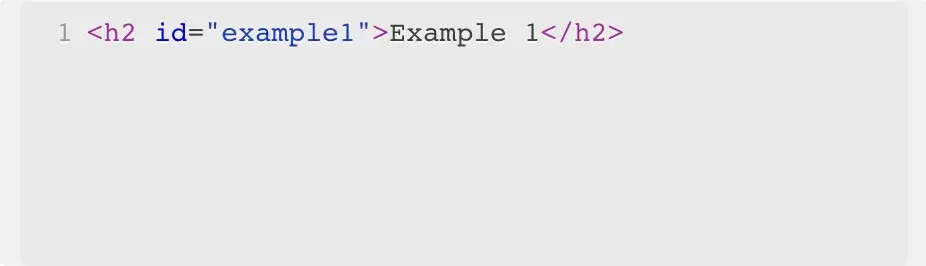
In this case I have named my object “Example 1.”
This is how that code looks in action:
3. Add opening and closing anchor link marks.
Place the complete opening Take from above before the text or object you want to link to and add a final roof.
To do this sets the location of the link. How to Look Your Code NOW:
The object you will link to.
4. Create the hyperlink that takes you to that text or object.
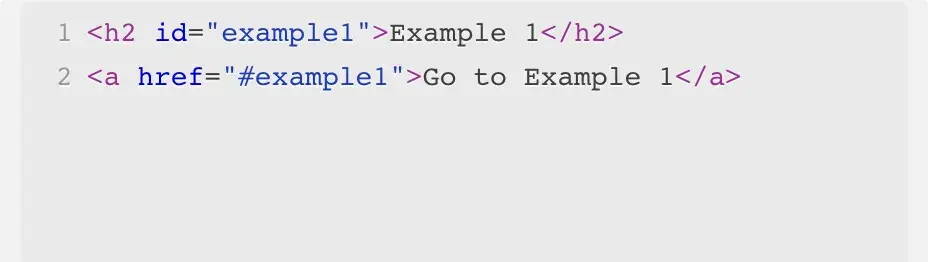
Now go to the part of the post where you would like hyperlink. You need to add a typical HREF attribute that indicates the destination of hyperlink. However, in the part where you will typically include a URL, you include the Pound Symbol (#) and then the name of the object you link to. This is what it looks like:
<a href= “#Insert_your_OBJECT_NAME_HERE”> Click here to see the content below.A>
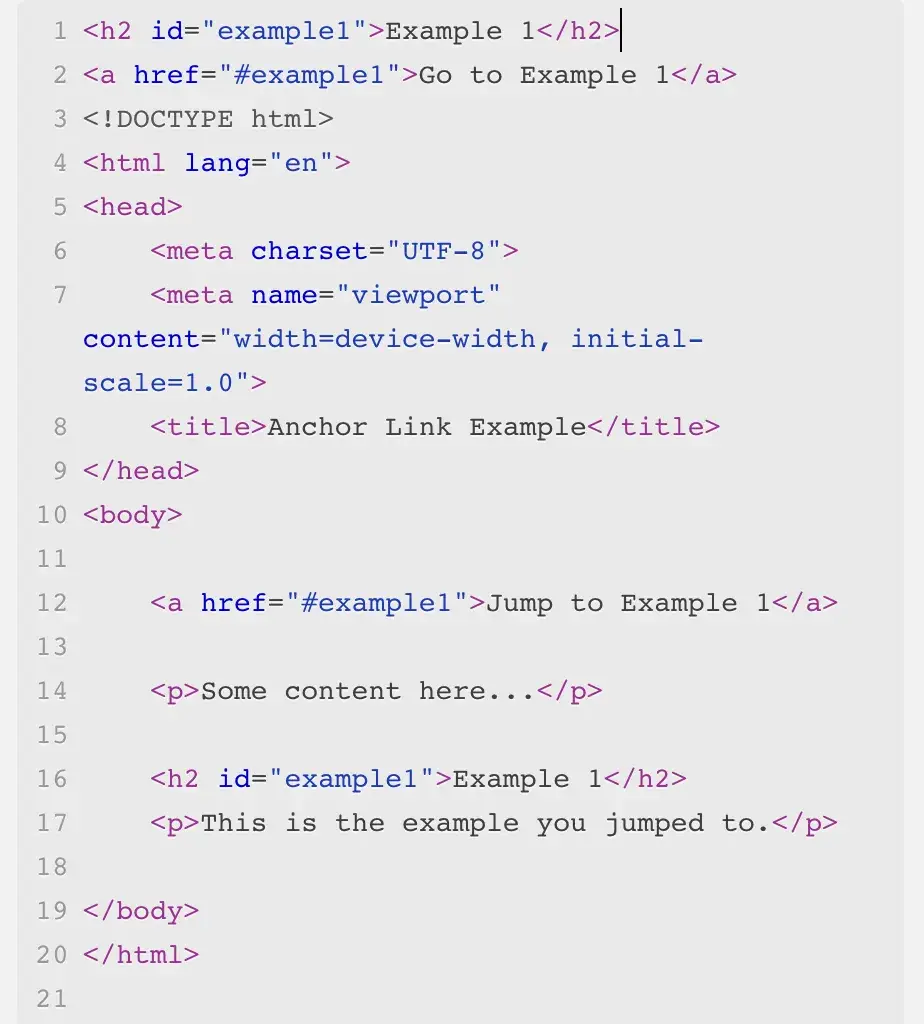
This is how the full code should look like when you are done:
If you want an easy way to try this, try our move and drop site builder for free.
Best practice for jumpelink
Although creating anchor link adds a few steps to your process before publishing a blog post, it can have a major impact on the user experience. Here are a few things to keep in mind when creating your next anchor link.
Prioritize the user experience.
Ankerlink is designed to improve the user experience. Creating links that leads you to a particular part of the page make it much easier for users to navigate through your content and find the information they are looking for. Without the help of anchor link, users can end up rolling through the page for a long time, which can lead them to jump.
Keep the user experience top-off when you create anchor link. Make sure the sections you link to within a page make sense from a reader’s point of view.
In the end, your customers will appreciate foamable, easy to read content and may be more likely to visit your site or make a purchase because of it.
Remember the organization.
Anchor link can be a great way to organize a long side with content. Think of the example of the table of contents that I mentioned earlier. A table of contents can improve the organization of long blog posts and make it easier for readers to find what they are looking for.
I also use Springlink for glossary. If you have a paragraph on your site that contains hundreds of expressions and definitions, it’s a great way to improve navigation to add a spring link. Not only can readers skip to the terms they want to learn, but jumping link can help connect different expressions together.
Know when to use external links.
It is important to remember the difference between a spring link and an external hyperlink.
A springlink is a link that ‘jumps’ to a specific section on a page on your site. However, external links are hyperlinks that direct users to a page on another site.
Creating an external link is a best practice when citing information from another source. This not only gives credit where it is due, but it also helps users find more information on the topic they read about.
I learned to create anchorlink easily
If you work with site content at all, it’s a must to know how to create an anchor link.
Even if you are like me and have no coding experience this is one of the easiest tricks to learn. As long as you understand how the different HTML elements work together, you can add all types of springlink to your content.
In my experience, I can tell you that linking to a particular part of a site is a simple way to make your content more user -oriented. Jump Links helps readers find the information they need faster, which ultimately helps them be more engaged with your content in general.
The editor’s note: This post was originally published in July 2014 and has been updated for freshness, accuracy and understanding.